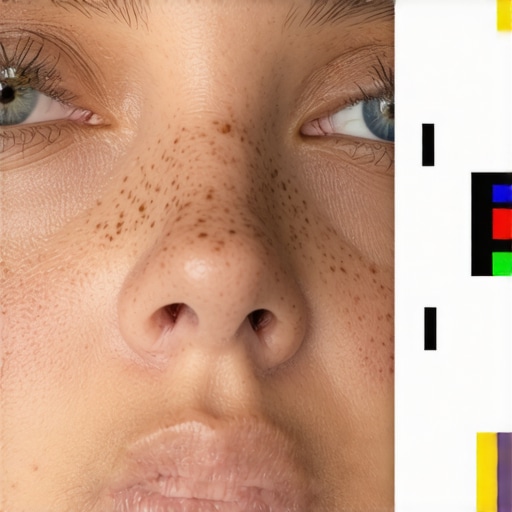
Ever stared at a photo of a loved one, only to feel disappointment because their skin looks dull, muddy, or flat? I remember the first time I noticed this issue. I spent hours editing a portrait, trying every filter and preset, but the skin still looked lifeless. That frustrating realization hit me — my editing tools were working against me, not for me.
In today’s post, I want to share the exact tactics I discovered to fix muddy skin tones effectively. And trust me, mastering these techniques transformed my workflow and made my portraits pop with natural warmth and vibrance. If you’re tired of dull skin ruining your photos, stick around. These tricks are simple, powerful, and applicable across top photo editing software for 2026.
Why Your Skin Tones Look Muddy and How to Fix Them
One common mistake I made early on was over-relying on saturation sliders without understanding how color balance impacts skin tones. This often led to an unnatural, muddy appearance instead of warm, healthy hues. I didn’t realize that proper adjustments in hue and luminance are key to vibrant skin. According to recent industry insights, the right tonal corrections can significantly enhance portrait quality ([source](https://editingsoftware.creatorsetupguide.com/best-photo-editing-tools-apps-for-creators-in-2025-expert-guide-and-trends)).
Now, let’s dive into practical tactics to bring clarity and life back to those muddy skin tones. Whether you’re using desktop editors or mobile apps, these approaches adapt seamlessly to your preferred tools. Ready to elevate your portrait editing game? Keep reading—you’re about to discover how to achieve stunning skin tones effortlessly.
Adjust Hue and Luminance for Natural Warmth
Start by opening your editing software and locate the HSL (Hue, Saturation, Lightness) or color correction tools. Recall a time I faced muddy skin after using global saturation; I lost the natural look until I targeted specific hues. In my case, I adjusted the orange and red hues, shifting their tones slightly on the hue slider to remove the dull cast. Simultaneously, increasing luminance in the orange spectrum brightened skin without affecting surrounding colors. This focused correction preserves the skin’s vibrance while avoiding over-saturation. If your software supports it, manipulate the hue and luminance sliders in tandem for optimal results. For detailed guidance, check out this comprehensive edit guide.
Balance Color with Selective Color Adjustments
Next, move to the selective color or color grading tools. Think of this as fine-tuning your mix – harmonizing different elements to achieve a cohesive look. In my experience, boosting the magenta and reducing yellow in the skin tones revitalized the natural reds and subtle undertones. Keep an eye on the skin’s appearance; avoid overshooting, which can introduce unnatural hues. Use a feathered mask or brush if your software allows, targeting only the skin areas. This precise selection ensures other parts of the image remain untouched. For mobile workflows, try apps like top mobile editors that support targeted edits seamlessly.
Refine Skin Tone with Luminance Masking
Luminance masking is a powerful technique I applied to isolate midtones, where skin typically resides. Picture it like a filter that only affects pixels within a certain brightness range. In my last project, applying a midtone luminance mask helped brighten dull areas without affecting highlights or shadows. This approach makes the skin appear healthier and more vibrant. To do this, generate a mask based on brightness levels, then gently increase the luminance or saturation within that mask. Combining this with the previous steps creates a balanced, lively skin tone. Explore videos on post-production techniques at this resource for more methods.
Smoothing and Texturing for a Natural Look
After color adjustments, apply subtle skin smoothing to eliminate blotchiness or uneven textures. Use frequency separation or soft brush tools to target only imperfections, not the overall skin. Remember, the goal is enhancement, not transformation. As I learned firsthand, over-smoothing can make skin appear plastic, so always keep a natural texture. If you’re editing on mobile, apps like mobile editors offer effective tools to achieve realistic results. These steps, when combined, lead to vivid, healthy-looking skin that elevates your portraits beyond the muddy, dull phase.Many believe that mastering video, photo, or audio editing is primarily about acquiring the latest software tools or presets. However, a critical nuance often overlooked is how user mindset and understanding of underlying principles impact results more than the tools themselves. For instance, many assume that more advanced features automatically produce superior quality, but in reality, misusing complex features can introduce artifacts or distortions, leading to unprofessional outcomes. According to expert insights, such as those from industry veteran editors, finesse and knowledge of core editing concepts matter more than sheer tool complexity ([source](https://editingsoftware.creatorsetupguide.com/best-video-editing-software-for-post-production-in-2025)). One common myth is that more expensive software equals better results; in fact, many top-performing edits are achieved with budget-friendly or mobile apps by understanding workflow nuances. Fellow editors often fall into the trap of tinkering endlessly with settings rather than focusing on storytelling principles or color grading fundamentals.
A subtle but impactful mistake is neglecting proper media management, which leads to lost footage or corrupted project files, causing delays and frustration. It’s crucial to develop disciplined organizational habits — a detail often dismissed by beginners but vital for professional workflows. Additionally, advanced editors know that blending multiple techniques — such as combining color grading with masking and sound design — can elevate projects from decent to outstanding. Yet, many underestimate the importance of sound editing, believing visuals alone suffice; this misconception hampers the overall impact of a project.
So, what’s the hidden nuance here? The key lies in understanding that technology is only as effective as the user’s command over its principles. Software acts as a tool; mastery stems from mastering techniques and workflows. For example, maximizing the potential of post-production software like top video editors hinges on deep comprehension of editing workflows rather than simply clicking through presets. Remember, continuous education and experimenting with nuanced adjustments—such as targeted color masks or detailed audio clean-up—are what differentiate professionals from hobbyists.
Have you ever fallen into this trap? Let me know in the comments and share your experiences or questions about improving your editing approach.
How Do I Maintain My Editing Tools for Long-Term Performance?
Consistent performance from your editing software and hardware is crucial for seamless post-production workflows. Personally, I rely on regular updates and proactive maintenance to ensure my tools stay in top shape. For example, I schedule monthly checks for software updates, which patch bugs and improve efficiency, as recommended by industry experts at this guide. Additionally, clearing cache files and temporary data prevents slowdown over time, especially when handling large projects.
Hardware health is just as vital. I perform routine disk cleanups and run disk health checks to prevent data corruption. Investment in reliable external drives and backup systems is non-negotiable — it protects your work from hardware failures. Remember, maintaining your equipment extends beyond software updates; physical care and organization boost longevity and performance.
Tools I Recommend for Seamless Workflow
When it comes to software, I favor top post-production software that balance powerful features with stability. My go-to is often Adobe Premiere Pro, supported by a robust hardware setup, including a dedicated SSD for faster rendering, and a calibrated monitor for accurate color grading. I also use automation scripts for repetitive tasks, which saves time and minimizes human error. For audio, I prefer efficient audio editing tools that streamline sound cleanup without sacrificing quality.
Mobile editors are increasingly vital, especially when on the go. Apps like those detailed in this resource allow quick adjustments and enable a flexible workflow, though I always transfer critical edits to desktop for final polish. Combining these tools with disciplined organization, such as structured file naming and version control, ensures a smooth long-term operation.
Where Is Video Editing Heading in the Future?
The future points toward AI-powered automation and smarter workflows. Tools will become increasingly intuitive, automating routine tasks while empowering creators with advanced features without steep learning curves. Staying ahead involves embracing these innovations now, experimenting with AI-assisted editing, and integrating versatile hardware solutions. For instance, regularly testing new software updates and hardware upgrades as they develop can keep your setup optimized.
To truly keep everything running smoothly, I recommend adopting a proactive maintenance mindset. Start by implementing regular software updates, backing up your work, and ensuring hardware health. Try out automation features in your software — for example, batch renaming or color correction macros — to speed up your process. Small, consistent actions can dramatically extend your equipment’s lifespan and maintain-high-quality output. Want to boost your post-production efficiency? Dive into the best tools for 2025 and get started today!
What I Wish I Learned Sooner About Post-Production Magic
One of the most impactful lessons was realizing that mastery over color correction isn’t about endless slider tweaks but understanding the anatomy of skin tones. I once tried to fix muddy skin by ramping up saturation, only to achieve garish results. The breakthrough came when I focused on hue and luminance, learning to target specific color ranges. This taught me that subtle, informed adjustments trump brute force edits. Another revelation was how essential proper media management is—losing files or facing lag due to clutter hampered my creative flow and highlighted the importance of organization. Lastly, I underestimated the power of combining techniques—color grading, masking, and sound design—each reinforcing the other for a polished project. These insights transformed my workflow and can do the same for you, turning struggles into streamlined success.
Top Picks That Elevated My Editing Game
For tools that truly make a difference, I rely on the best post-production software of 2025 for its powerful features and user-friendly interface. When I need flexibility on-the-go, mobile editing apps ensure I stay productive without sacrificing quality. To refine audio seamlessly, audio editing tools help me clean up background noise and improve sound clarity. Each resource has repeatedly proved its worth, helping me craft professional-grade content with less effort and better results.
Now It’s Your Turn to Elevate Your Editing Skills
Remember, mastering skin tones and refining your post-production isn’t about chasing perfect software—it’s about understanding core principles and applying them thoughtfully. As you experiment with these techniques, you’ll notice your videos and photos come alive with vibrance and natural warmth. The future of editing is quite promising with AI and smarter workflows just around the corner. Embrace these advancements, stay curious, and keep honing your craft. Your creative potential is limitless—ready to transform your projects today?


Leave a Reply